The two forms — stool vs. throne
Almost every queening piece on the market falls into one of two geometries. Both solve the same problem (sustainable, comfortable oral position) with very different ergonomics and room footprints.
The queening stool (sometimes "smother box") is a low padded rectangle — typically twenty inches wide, fourteen inches tall — with a circular cutout on top and an open cavity beneath. The kneeling partner lies on their back on the floor, head inside the cavity; the seated partner sits or kneels on the stool. This is the form most retailers actually sell, the form Master Series, Liberator, and UABDSM all manufacture in volume, and the form most couples end up with.
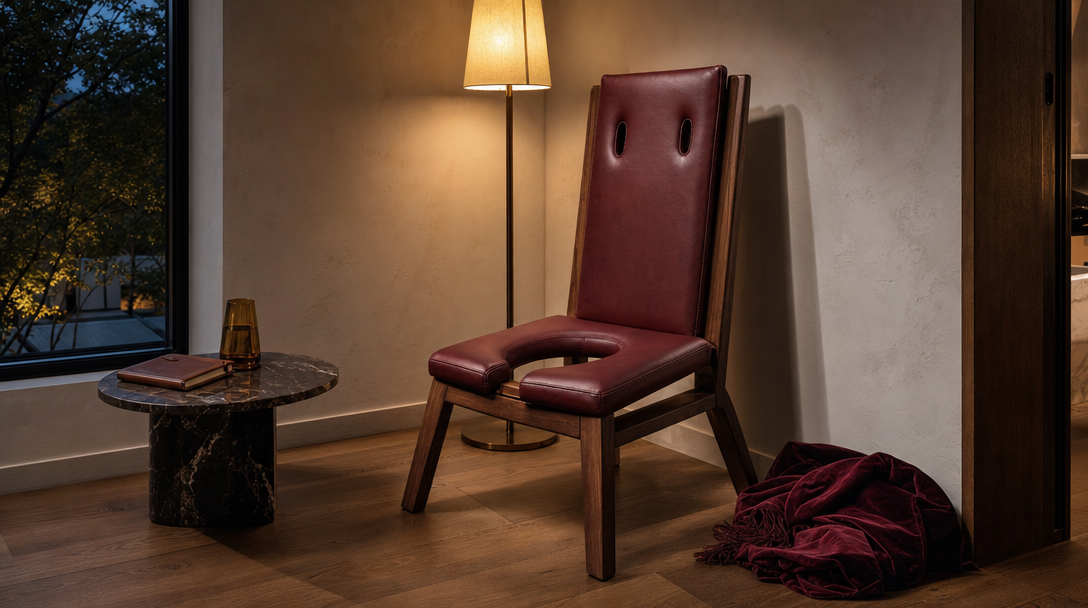
The queening throne (or "queening chair" in the older sense) is a tall-backed seat — 22–28 inches at the seat, 32+ inches at the back — with the same circular cutout. The kneeling partner kneels in front of the throne, head under the seat. It reads as a high-backed accent chair from a doorway, which is the discretion advantage. The disadvantage: nobody mass-produces them. Almost every throne on the market is custom-made or DIY-modified from a hardwood chair.
Most readers should buy the stool. It is cheaper ($150–$300 vs. $400–$1,400+), structurally simpler, easier to clean, and works in a smaller floor area. The throne wins on discretion and on the "looks like residential furniture" test — at the cost of a much higher price and a much smaller selection.
How to choose one
Stool height and head-cavity clearance
A queening stool is typically 12–16 inches tall. Higher than that and the kneeling partner's neck angle is wrong; lower than that and the seated partner is sitting almost on the floor. The internal cavity (where the kneeling partner's head goes) wants 8–10 inches of vertical clearance from cavity floor to seat underside, which accommodates most adult heads with a thin pillow underneath. Anything tighter and longer scenes are uncomfortable.
Some stools are open on three sides (back, left, right) for easier entry and exit; some are open only at the front. Three-sided is the cleaner ergonomics. Verify the internal width is at least twelve inches — your shoulders are wider than your head.
Throne seat height (for the rarer form)
A tall-back queening throne sits at 22–28 inches at the seat. A 22-inch seat works for a smaller seated partner and a taller kneeling partner; a 26-inch seat is the more common middle. Anything above 28 inches puts most kneeling partners into neck strain that ends scenes early. Adjustable-height columns exist but develop play over time; fixed height holds up longer.
The cutout — diameter, edge, and edge treatment
Cutout diameter ranges from six to ten inches. Six inches is restrictive; ten inches starts to feel structurally compromised on smaller chairs. Eight inches is the standard and the right answer for most readers.
The cutout edge matters more than the diameter. A raw plywood edge is abrasive on the receiver's skin and grim to clean. Look for a continuous rolled upholstery edge — the same vinyl or leather that covers the seat wraps over the cutout's inner edge and is stapled on the underside. If the listing shows the cutout but doesn't describe the edge treatment, assume it is unfinished and price accordingly.
Handholds and the structural piece (throne only)
On a tall-back throne the back panel does two jobs. It supports the seated partner leaning back; it provides handholds. D-rings on the chair sides or open cutouts in the back panel are both fine, structurally, if the frame behind them is hardwood. Both fail if the frame is MDF and the handholds are screwed in rather than bolted through. On a stool, handholds are usually integrated straps or grab handles on the box sides — they carry less load (no seated partner leaning back) but the same material rules apply.
The diagram above shows the throne form. The stool form is geometrically simpler: a low padded rectangle with the cutout on top, an open cavity below, and (often) straps or grab handles on the box sides instead of a back panel. The seat-height and cutout-edge specs apply to both forms.
Where to put it
A queening stool wants to sit in the middle of clear floor space — the kneeling partner needs to lie down beside it to slide their head into the cavity. Plan a 5×4-foot clear floor area: roughly the size of a small rug. Carpet or a thick rug under the stool is not optional; this is where the kneeling partner's whole body spends the scene.
A queening throne, by contrast, benefits from being against a wall. The back panel doesn't need clearance, and the kneeling partner faces the chair from one direction only. A corner placement, with the chair angled at 30 degrees away from both walls, works particularly well. The kneeling partner's knees rest on a permanent floor pad in front of the chair — a six-inch memory foam gardening pad (sold at any home center for under $30) feels significantly better than even a plush rug for any scene over a few minutes.
Discretion favors the throne. A throne with a throw folded over the seat reads as a high-backed accent chair to anyone who isn't looking from directly above. A stool, even covered, reads as a padded box — there is no innocent furniture category that maps cleanly to it. If discretion is a hard requirement (in-laws who visit, kids in the home), the throne is worth the extra cost or the DIY effort.
The kneeling-partner consideration
Most queening furniture listings describe the piece from the seated partner's perspective. The kneeling partner is, in practice, the person who spends the longer continuous time in a fixed position. On a stool they lie on their back on the floor; on a throne they kneel on a floor pad. Either way, what they lie or kneel on is just as important as the piece itself.
Practical implications: plan a 5×4-foot clear floor area around the piece (stool) or in front of it (throne). A thick rug or a dedicated floor pad goes there. Lighting goes overhead and slightly to the seated partner's side — never directly behind the kneeling partner's head, which produces a halo effect and unflattering shadows. A small side table within reach of the seated partner is the detail most rooms miss and the best rooms include without fanfare.
Two featured pieces
Queening furniture has no real luxury tier. The premium custom market is so small that no major retailer carries it; serious pieces are custom-made or DIY. What follows is the practical middle and the build-it path. The Tier Stack at the end of this article links to each.
The buy-it path — UABDSM's queening stool
UABDSM carries the Master Series queening stool, which is the closest the mass market gets to a "standard" piece. Padded vinyl over a sturdy box frame, finished cutout edge, integrated grab straps, open-cavity ventilation on the front and sides. It is not a piece of editorial furniture — it reads as exactly what it is — but it is the option that works, ships in days, and costs well under what a custom throne would.
The build-it path
A queening stool is easier to build than almost anything else in this catalogue. Straight cuts, a single hole-saw operation, standard upholstery. The next section walks through it. If you prefer the throne form, the older approach of modifying a used hardwood chair is documented at the end of that section.
Build it yourself
A DIY queening stool from plywood costs about $40–$80 in materials and takes a careful afternoon. The stool form is the easier build and the more common buy; the throne form is documented after.
The stool — plywood box (most common)
- Cut ¾-inch plywood to size: a top panel 20×16 inches, two side panels 16×14 inches, a back panel 20×14 inches. The front and part of one side are intentionally left open (head entry).
- Cut an 8-inch circular cutout in the top panel, centered on the back-to-front axis, set about six inches from the back edge. Use a hole saw. Sand the edges smooth.
- Assemble with through-bolts and wood glue at the corners. The joinery does not need to be elegant — it will be upholstered.
- Wrap the top panel with 2-inch high-density foam and marine-grade vinyl, stretching the vinyl through the cutout and stapling on the underside. Continuous vinyl wrap through the cutout edge is the cleanability point.
- Wrap the outer side panels with thinner foam and vinyl if you want the piece to feel finished. The inner cavity walls can be painted or left as bare plywood.
- Drill two ½-inch ventilation holes in the back panel near the top — they help airflow through the head cavity during longer scenes.
The throne — modifying a used hardwood chair
If discretion is the priority, the throne form is worth the extra work. Source a used hardwood chair with a tall back (32+ inches above seat). Cut new front legs 9–10 inches taller than the existing fronts to bring final seat height to ~26 inches. Cut an 8-inch hole saw cutout in the front third of the seat, centered. Wrap with foam and marine-grade vinyl (continuous through the cutout). Drill 4-inch oval handhold cutouts in each side panel of the back at hand height, or bolt through D-rings with backing plates. Refinish to match your room palette. Detailed plans on the Sensual Interiors roadmap.
Three Approaches T
Two ways to bring the stool home, from $40 to $300.
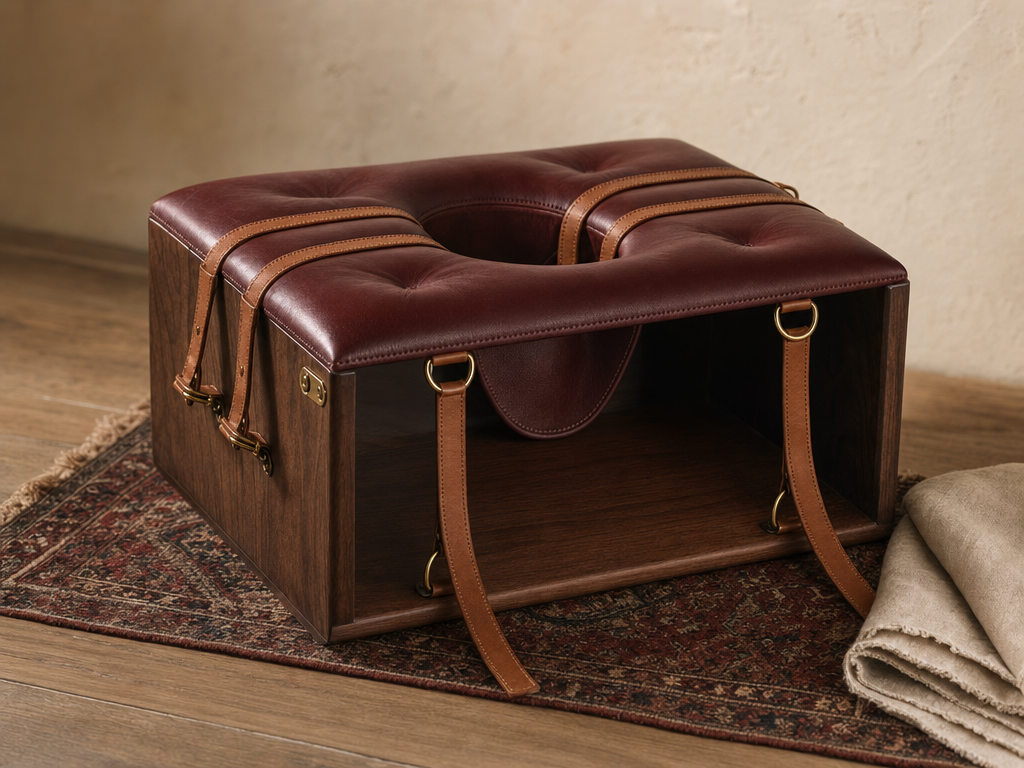
Plate T.a
Buy it · $200-$300
UABDSM Queening Stool
Padded vinyl over a sturdy box frame, finished cutout edge, integrated grab straps, three-sided head cavity for ventilation and easy entry. The Master Series piece — the closest the mass market gets to a standard queening stool.
14" tall · 8" cutout · vinyl wipe-clean
Shop at UABDSMAffiliate link
Plate T.b
Build it · $40-$80
Build a plywood queening stool
Three sheets of ¾-inch plywood, an 8-inch hole saw, foam and vinyl. About $40-$80 in materials, a careful afternoon. The build-it section above is the starting point.
Open the build guideWe document every furniture piece across three approaches — the luxury option the retailers push, the mid-range alternative most readers actually buy, and the DIY path that earns us no commission. The DIY card exists so the other two are honest recommendations.